[1.16.5] Гайд по Refined Storage
Помощь
Хотите верьте, хотите нет, но писать отдельный гайд по РС то же самое, что писать гайд по АЕ2 (что уже сделал Бригадир, кстать)
Без шуток, Refined Storage – это идейный брат Applied Energetic 2. Если без лукавства – сходство почти полное. Почти.
В чем же основные различия, а так же как нам с вами сотворить ту самую вундервафлю для хранения килотонн ресурсов и настройки их в автокрафт – разберем здесь.
Хотелось бы расписать все в красках, да некогда.
Основные компоненты, которые понадобятся нам в процессе созидания супер-пупер хранилища это:

Обогащенное кварцем железо
Связующий процессорный элемент
Необработанные процессоры (базовый, улучшенный, продвинутый), которые можно переплавить в уже готовые процессоры.
Крафты оных можете найти в JEI (если кто не понял этого по гайдам за меканизм и пневматик).
Самая простая сеть обязательно должна включать в себя такие вещи, как:


Сердце всей вашей системы, которое любит принимать в себя энергию и передавать другим узлам, да агрегатам. На одну сеть – одна такая махина. Здесь же можно проводить мониторинг потребления энергии и количества аппаратов, которые зависят от конкретного контроллера.


Мозги. И тем вместительнее они будут, чем более вместительные диски вы будете туда сувать, ага. В одной системе может быть неограниченное кол-во таких приводов, а потому сеть можно сделать вместительнее, чем карманы некоторых чиновников.


Почему терминала два? Потому что первый расчитан конкретно для предметов. Технически, в нем можно располагать жидкости, но только в какой-нибудь емкости (ведро, бак, пузырёк). Второй же терминал будет принимать жижу в ее изначальном состоянии, т.е. в миливёдрах. Тот самый случай, когда в систему можно лить воду без гарантируемого КЗ.

А вот тут маленький нюанс, Петя. Стандартный крафт кабелей выглядит вот так:

Но в угоду баланса крафт был изменен на следующий:

Кварцевое железо было заменено на висмутовую сталь, сам выхлоп урезан в два раза.
Единственный способ связать все части пазла воедино, да. К этому же кабелю, кстать, будут цепляться различного рода шины, но об этом чутка попозже.

На 1к, 4к, 16к и 64к (если кто не понял «К» — обозначение равное тысяче)

На 64к, 256к, 1024к и 4096к
Объем дисков учитывает только количество предметов без ограничений по их типу (привет АЕ2 и его вечно забитые всяким калом диски, которые висят в системе полупустые).
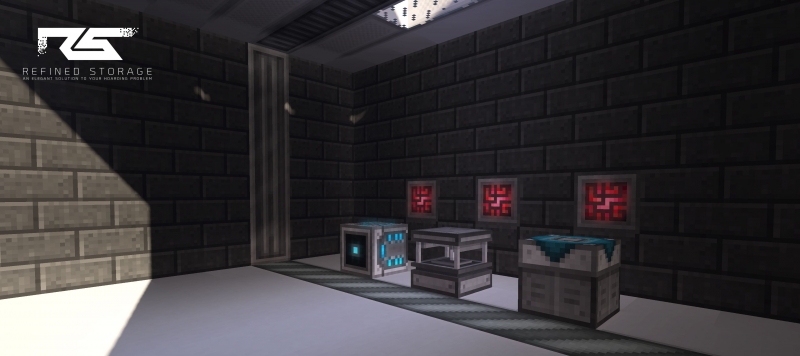
Строим нашу систему так, как вам удобно, но с тем условием, что от контроллера все агрегаты должны соединяться через РС-кабель (тот, что выше). После чего запитываем контроллер любым источником энергии.

Энергетический куб из меканизма идеально подходит к нашему контроллеру. Далее следует дисковый привод и два терминала (для предметов и жидкостей). В дисковый привод помещаем наши диски:

Кнопочки интерфейса рекомендую потыкать самостоятельно. Тотального ужаса не ждите, тут нечего ломать.
Итак, мы молодцы, наша система хранения готова, по сути. Теперь на нее можно только навешивать новые терминалы и агрегаты, тянуть провода и подключать новые элементы. О них чутка попозже. (Хотя, все моменты для АЕ2 справедливы и для РС, потому можете смело чекать гайд Бригадира в свободное от игры время.)
Источник
Гайд по Refined Storage.

Weezyoff
Новичок
Данный мод позволяет упорядочить хранение предметов и взаимодействие с ними. С чего же стоит в нем начать?
Первые шаги
Мод добавляет несколько новых расходных материалов которые нам пригодятся. Давайте разберем их.
Не менее важным элементом крафта являются процессоры и ядра. Всего их шесть видов. Каждый из них понадобится нам в равных мерах, поэтому объяснить какой за что отвечает невозможно.

Наконец мы подобрались к основной фиче данного мода. Хранение предметов, неограниченное количеством слотов и количеством предметов в стаке. Что же для него нужно? Давайте посмотрим.

Допустим мы создали нужные нам предметы. Так как же их подключить? А все на самом деле легко и просто.

Примечание: На данном скрине используется творческий контроллер, недоступный в режиме выживания.
Вот и готова базовая система хранения. Она имеет интуитивно понятный интерфейс, так что объяснять как она работает я не буду.
Думаю первое что вы захотите сделать, так это автоматизировать взаимодействие с приборами и хранилищами из других модов. Для этого RS предоставляет нам специальные шины которые взаимодействуют с приборами/хранилищами. Так же, следует упомянуть, что система является сама себе-одним большим проводом, так что подключить провод можно не только со стороны контроллера, но и к любому прибору.
Источник
Refined Storage — система хранения [1.16.5] [1.15.2] [1.14.4] [1.12.2] [1.11.2] [1.10.2]
Мод Refined Storage — добавляет в майнкрафт очень крутую систему хранения блоков и жидкостей. Мод позволяет создавать настоящую сеть хранения, передачи и автоматизации ваших обычных предметов. Вы сможете хранить ваши блоки и жидкости на специальных дисках внутри системы, установив терминалы доступа вы сможете добавлять и забирать ваши вещи в любой точке карты.
Это индустриальный мод, механизмы сети работают на FE энергии, и конечно мод просто необходим в любой индустриальной сборке, ведь никто не хочет создавать, заполнять сотни сундуков, а потом искать в них нужные ресурсы, этот мод позволит навести порядок с хранением ваших ресурсов, да и в плане развития и обустройства базы этот мод очень хорош и футуристичен.
Базовая сеть хранения создается из блока контроллера сети, блока дискового привода с дисками хранения внутри и терминала ввода вывода предметов. Ставите их вместе, либо соединяете проводами и вы получаете «сундук» в который можно класть и забирать предметы через любой терминал подключенный к общей сети, вместимость сети зависит от количества и качества дисков хранения внутри дискового привода.
Развиваясь в моде вы сможете создать улучшители системы и продвинутые диски хранения, соединить части системы без прокладки проводов, создать себе переносной терминал и пользоваться вашими ресурсами «на ходу». Мод позволит автоматизировать разные процессы, автоматизировать крафт и переработку ресурсов, так как вы сможете выгружать и загружать ресурсы из разных машин, установок, сундуков. Можно создать специальные шаблоны крафтов, а после заказывать необходимые предметы, а сеть сама возьмет ресурсы, скрафтит предмет и добавит его в сеть.
Мод имеет перевод на Русский, и не очень сложен в освоении, на первый взгляд можно увидеть огромное количество блоков, но это просто блоки системы с одним функционалом, но разного цвета. Мод является аналогом известного мода Applied Energistics и добавляет схожий функционал, но, естественно имеет различия и уникальные возможности.


Дополнения:
- Reborn Storage — автоматический крафт на версиях 1.12.2 и 1.10.2
- refined storage requestify — блок поддерживающий минимально указанное количество предмета в системе.
Источник
Autocrafting with Refined Storage
This is a community-written guide. It was written to help players to get accustomed to setting up autocrafting with Refined Storage.
Содержание
About this Guide
This guide is not an exhaustive description of items, nor a tutorial on using each item. It is a helping hand to get you started with using Refined Storage for autocrafting. Throughout this guide you’ll find links to named items. Be sure to explore these links for full details, descriptions and illustrations.
The Foundation
This guide assumes that you already have a working Refined Storage setup, storing your materials. It will step you through a couple of simple autocrafting routines that should serve you well in understanding the process, enabling
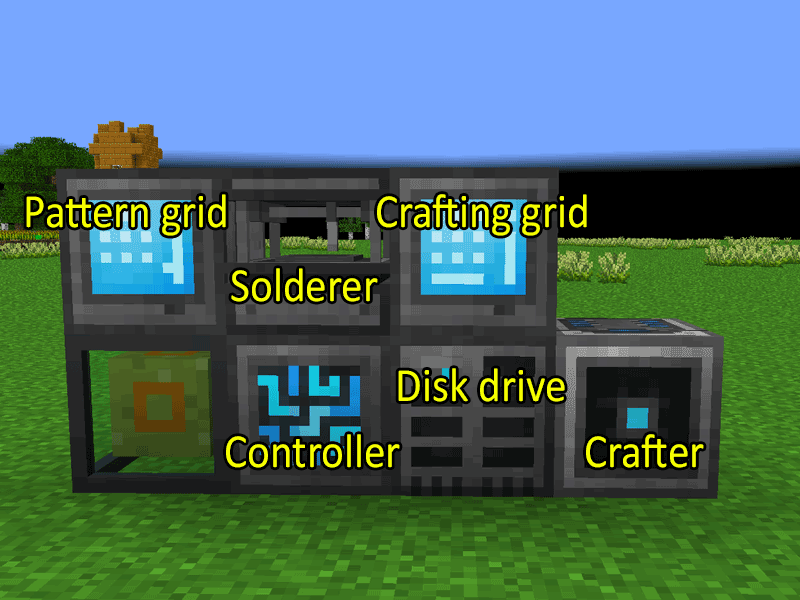
- Start by having a working Refined Storage setup. At minimum, you’ll need a Controller, a Crafter, a Pattern Grid, some Patterns and some storage.

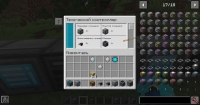
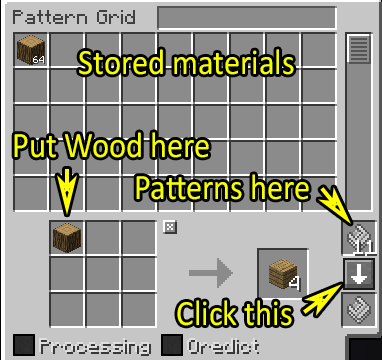
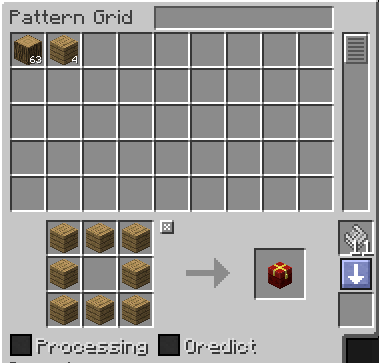
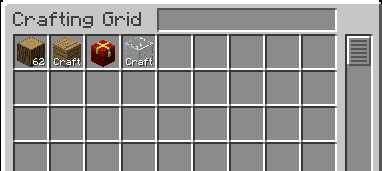
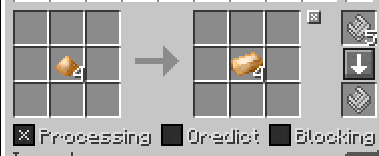
- Make some Patterns and put them in the pattern slot as illustrated.
- Put a piece of Oak Wood in the crafting grid. The output, 4 Oak Planks, will appear on the right.
- Click the Create Pattern button. A pattern will be programmed and appear in the lower slot.
- Hover your mouse pointer over the pattern. You’ll see it now shows information about the recipe. Remove the pattern.
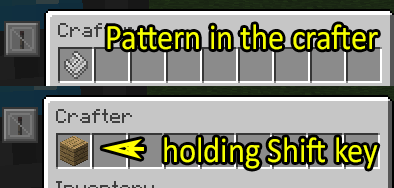
- Place your pattern in a Crafter. You’ll notice if you hold the Shift key that the pattern will show the item it creates.
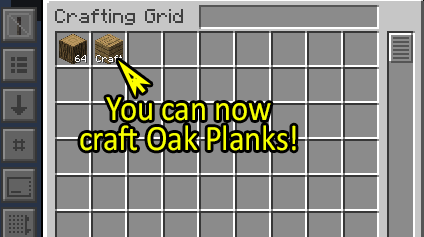
- Open your Grid and you’ll see a new item. The ability to Craft Oak Planks.
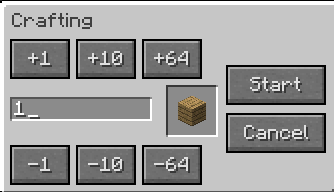
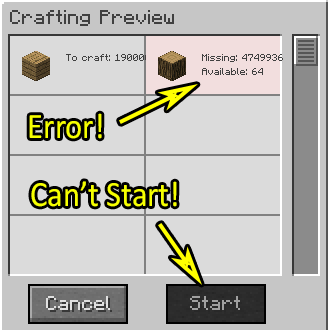
- Left-click the recipe and you’ll be asked to specify how many to craft. If you have insufficient resources, you’ll get an error like this:
- Otherwise, you’ll receive a confirmation dialog. Click Start and it’ll craft your item.
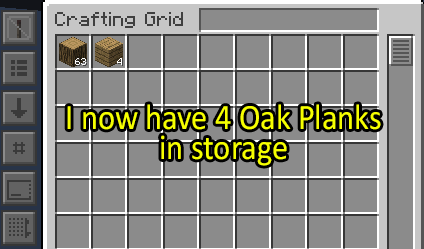
- Notice how even though I only specified 1 Oak Planks, it crafted 4. That’s because 4 is the minimum craftable by the recipe. This can be useful, so we’ll talk about it some more, later.
- Go back to your Pattern Grid. Clear the crafting grid by clicking the X at the top right and lay out the recipe for making a chest. Click Create Pattern.
- Put the pattern in your Crafter. Open your Grid and you’ll now see that you can create chests as well.
- Go ahead and tell it to craft a chest. The Refined Storage system will automatically calculate what recipes it needs to craft to make you a chest. First it makes some more planks, then it makes the chest. Well done! You’ve now set up multi-step automatic crafting. Take a breather and we’ll move onto the more difficult stuff.

Using External Machines
So far, the crafting we’ve done takes place entirely within the Refined Storage network. In addition to being able to craft internally, your Refined Storage system can also create Processing recipes that send parts of the job out to an external machine. To create a Processing recipe, you first need to craft the item once so that you can teach it to the system.
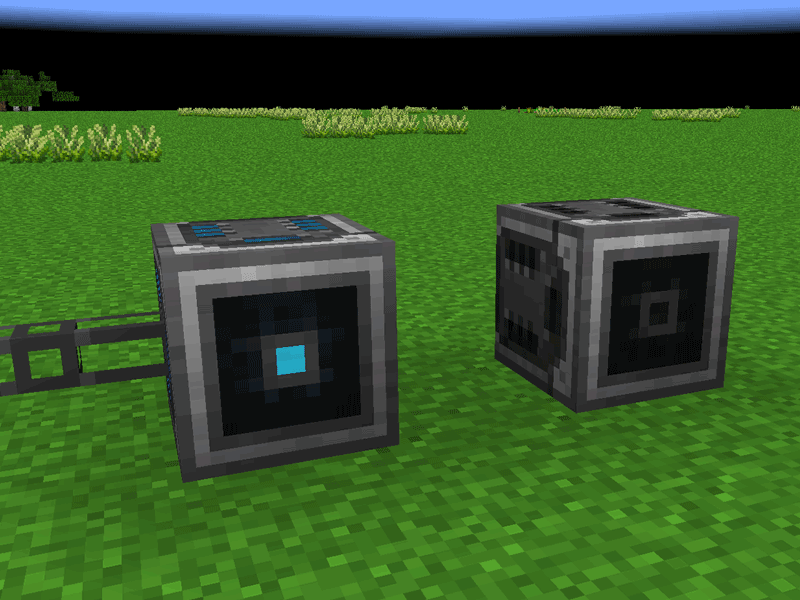
- The Crafter has a front face that is clearly marked by a dot that glows blue when the Crafter is connected to the network. When using external machines, this face must touch the external machine.
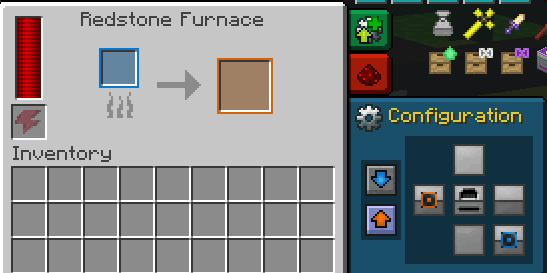
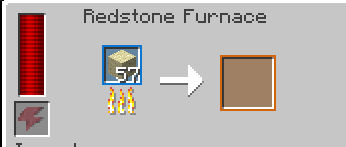
- Place your external machine in front of the Crafter and configure its sides to accept materials from the Crafter and output to a different face. In this example, I’m configuring a Thermal ExpansionRedstone Furnace to accept materials from the rear face, and output to the left face.
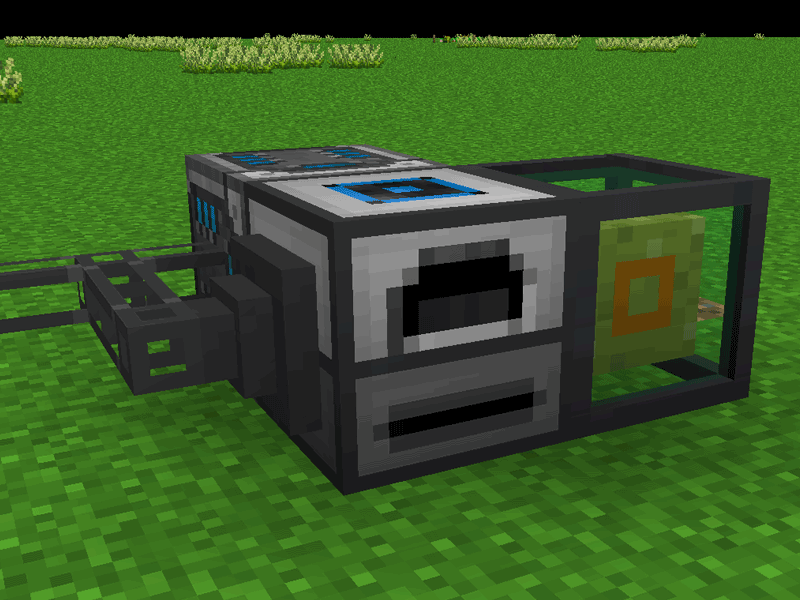
- Attach an Importer to the output face of the external machine. Use Cables to ensure that the Crafter and Importer are connected to the network. Ensure that the external machine has power.
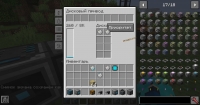
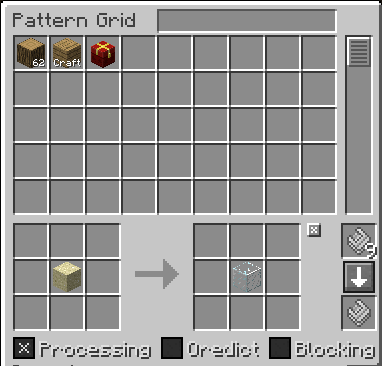
- Open the Pattern Grid and clear the crafting grid. Check the box labelled Processing. This tells the grid to create a pattern that will use an external machine.
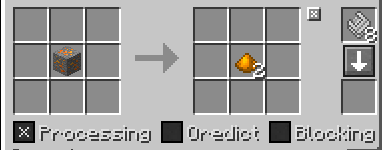
- Put a piece of Sand on the left side, and a piece of Glass on the right side, then click Create Pattern.
- Put the pattern in the Crafter that’s connected to the Furnace and open your Grid. You’ll see that you can now create Glass!
- If you don’t already have Sand in your storage system, put some in and tell it to craft some glass. Once you click Start, it will send the Sand to the furnace. The Importer will automatically extract the Glass and put it into your storage system. The speed with which glass appears in your storage system depends on the speed of the furnace, so if it’s too slow, upgrade your furnace!
Advanced Outsourcing
By setting up patterns with recipes for different steps of a process, quite complex items can be crafted with the click of button. Here are a couple more recipe examples (using Thermal Expansion machines). Note that Crafters used to interact with external machines can still craft regular recipes, too.
Bronze
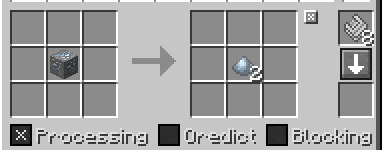
In the previous example, we used a Redstone Furnace to smelt glass. To make bronze, we first turn Ore into Dust, mix the dusts then smelt the mixture into ingots.
- Create recipes that turn 1 Tin Ore into 2 Pulverized Tin and 1 Copper Ore into 2 Pulverized Copper (Processing recipes)
- Put these in the Crafter facing your Pulverizer.
- Create a recipe to combine 1 Tin Dust and 3 Copper Dust to make 4 Bronze Dust (Regular recipe)
- As a regular recipe, it can go in anyCrafter.
- Create a recipe to smelt Bronze Dust into Bronze Ingot (Processing recipe, one Bronze Dust gives one Bronze Ingot)
- Place this recipe in a Crafter facing your Redstone Furnace.
- Now you can craft Bronze Ingots at the touch of a button!

Signalum
In the case of crafting Signalum, we have to get creative because we have to fill a bucket with Destabilized Redstone. For that, we’re going to use external item transport, not just external machines.
- First, make a Destabilized Redstone Bucket and some Silver and Copper dusts.
- Create recipes to send Silver Ore and Copper Ore to a Pulverizer to make Dusts. (Processing recipes)
- Put them in the Crafter facing your Pulverizer.
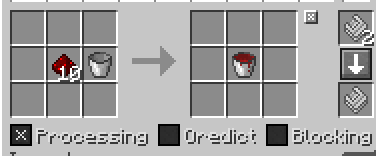
- Create a recipe that takes 10 Redstone Dust and a Bucket, returning a Destabilized Redstone Bucket (Processing recipe)
- Create a recipe to craft Signalum Blend (Regular recipe)
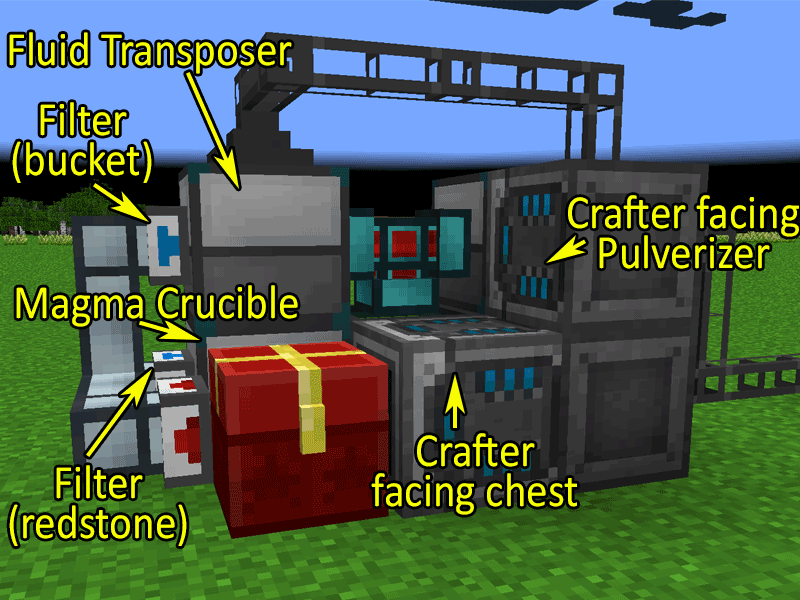
- Position a Chest in front of a Crafter and set up Itemducts to take whatever is in the chest and send it to the Magma Crucible and Fluid Transposer. Redstone goes to the Crucible, bucket to the Transposer. Filters help make this easy.
- Set the Magma Crucible to send its output directly to the Fluid Transposer and place an Importer on the output face of the Transposer.
- Put the bucket recipe in the Crafter facing the Chest. The recipe combining the dusts with the filled bucket can go in any Crafter.
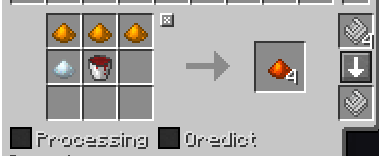
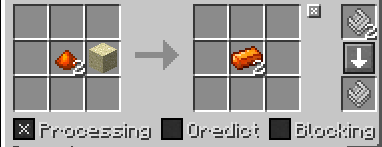
- Finally, create a Processing recipe to send 2 Signalum Blend and 1 Sand that returns 2 Signalum Ingot and put that recipe in a Crafter facing an Induction Smelter.
- Don’t forget to put an Importer to collect the output of the Induction Smelter.
Batch Sizes
As noted earlier, some recipes, such as Oak Log to Oak Planks output multiple items. Sometimes it’s desirable to produce more than the minimum. With a regular recipe, the quantities are fixed. However with Processing recipes, you’re free to set your own quantities. For example, rather than making a recipe to pulverize one piece of ore at a time, you can set the recipe to send two piece, three pieces, half a stack or a whole stack at a time.
To adjust quantities in a Processing recipe, left and right click the icons in the crafting grids to lower or raise the quantity. Bear in mind that the Crafter can only follow the exact recipe. If a recipe specifies a stack of 64 pieces of ore returns 128 dusts, it will not be able to run if you only have half a stack of ore in storage.
Autocrafting with Fluids
Refined Storage is also able to autocraft with fluids. The process described above can be slightly simplified by putting a Fluid Interface on the output of the Magma Crucible. Create recipes using a filled bucket as normal. The Crafter will substitute stored fluids as needed.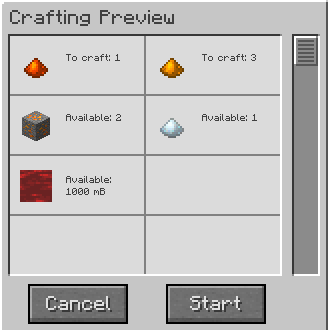
Afterword
Refined Storage autocrafting is both flexible and powerful. With some creative thought, the crafting of almost any in-game item can be automated.
Источник